Protein-Packed Breakfast Burritos: A Morning Meal That Wraps It All

Breakfast burrito cut in half showing eggs, potatoes, peppers, and melted cheese.

When I was growing up, weekend breakfasts were never just a quick bite—they were events. One of the most beloved dishes at our family brunch table was my Nonna’s improvised breakfast wraps—soft tortillas filled with eggs, potatoes, and whatever vegetables were on hand. Inspired by those flavorful, no-fuss mornings and a love for bold, Mexican-influenced comfort food, these breakfast burritos are a global spin on tradition.

Whether you’re fueling up for the day, prepping ahead for a busy week, or hosting a laid-back brunch, these burritos bring warmth, nutrition, and cheesy satisfaction in every bite.


Why You’ll Love These Breakfast Burritos

  • Quick and Easy: Made with everyday ingredients in under 30 minutes.
  • Customizable: Add your favorite proteins, veggies, or sauces.
  • Meal-Prep Friendly: Make ahead, freeze, and reheat in minutes.
  • Balanced Nutrition: Eggs, potatoes, cheese, and optional add-ins provide protein, fiber, and flavor.

Ingredients

  • 6 large flour tortillas
  • 6 large eggs
  • ¼ cup milk
  • 2 medium potatoes, diced and cooked (boiled or pan-fried)
  • ½ cup shredded cheddar cheese
  • ¼ cup chopped fresh cilantro (optional)
  • ¼ cup diced red onion
  • ¼ cup diced bell pepper
  • 1 tablespoon olive oil
  • Salt and pepper to taste
  • Salsa or hot sauce, for serving

Optional Add-ins:

  • Cooked sausage or bacon
  • Black beans or refried beans
  • Avocado slices or guacamole

Step-by-Step Instructions

Step 1: Cook the Potatoes

  1. Heat olive oil in a skillet over medium heat.
  2. Add diced potatoes, season with salt and pepper, and cook until golden brown and fork-tender (about 10–12 minutes).
  3. Set aside.

Step 2: Scramble the Eggs

  1. In a bowl, whisk together the eggs, milk, and a pinch of salt and pepper.
  2. Pour into a non-stick skillet over medium-low heat and scramble gently until just set.
  3. Remove from heat—don’t overcook, as the eggs will continue to firm up in the burrito.

Step 3: Sauté the Veggies

  1. In the same pan, add a touch more oil if needed and sauté the red onion and bell pepper for 3–4 minutes until softened.

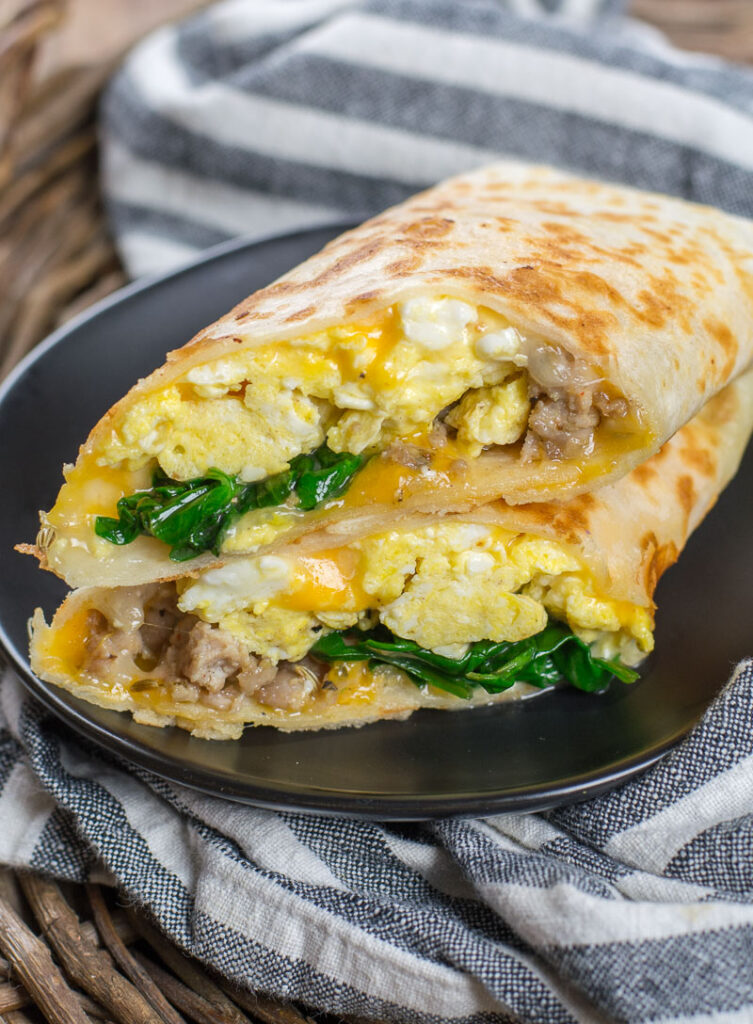
Step 4: Assemble the Burritos

  1. Warm the tortillas briefly in a dry pan or microwave to make them pliable.
  2. On each tortilla, layer scrambled eggs, cooked potatoes, sautéed veggies, shredded cheddar, and any optional ingredients.
  3. Top with cilantro and a drizzle of salsa or hot sauce.

Step 5: Wrap and Serve

  1. Fold in the sides and roll tightly into a burrito.
  2. Optional: Toast each side in a dry skillet until lightly crisp for extra texture.
  3. Serve immediately or wrap in foil for on-the-go.

Make-Ahead and Storage Tips

  • Refrigerate: Store burritos wrapped in foil or in airtight containers for up to 3 days.
  • Freeze: Wrap tightly in foil or freezer-safe wrap and store for up to 2 months. Thaw overnight in the fridge or reheat straight from frozen.
  • Reheat: Microwave for 1–2 minutes or bake at 375°F for 10–15 minutes until heated through.

Variations and Substitutions

  • Vegetarian: Stick with the base recipe or add black beans and avocado for extra substance.
  • Protein Boost: Add sausage, bacon, or tofu scramble.
  • Spicy: Include jalapeños or a dash of cayenne in the eggs.
  • Cheese Swap: Try Monterey Jack, pepper jack, or even feta.

Serving Suggestions

  • Side Ideas: Fresh fruit, yogurt, or a small green salad.
  • Drinks: Pair with a smoothie, iced coffee, or a fresh lime agua fresca.
  • Toppings: Serve with sour cream, more salsa, or a squeeze of lime.

Why Breakfast Burritos Work Any Time of Year

Whether it’s a chilly winter morning or a warm summer day, breakfast burritos offer comfort, warmth, and endless possibilities. They’re adaptable to seasonal veggies, and the balance of eggs, potatoes, and cheese keeps you full and energized for hours.

From busy weekdays to relaxed weekend brunches, these burritos are a household favorite that checks all the boxes: filling, flavorful, and fast.


Final Bite

If you’ve never made breakfast burritos at home, this is your sign to start. They’re an easy way to transform simple ingredients into a meal that feels hearty and special. Bonus? You can make a big batch, freeze them, and have delicious, homemade breakfasts ready in minutes.

Try them with your favorite toppings, share them with your family, and don’t forget to tag your creations with #breakfastrecipes #burritos #comfortfood and more!

Roasted Parmesan Cauliflower: A Crispy, Flavorful Twist on a Classic Veggie

Roasted cauliflower florets topped with golden Parmesan and fresh parsley.

Growing up in an Italian household, roasted vegetables were a staple at every family gathering. But it wasn’t until I experimented with cauliflower—tossed in olive oil, garlic, and a generous sprinkle of Parmesan—that I discovered this golden, crispy delight. My grandmother used to roast everything, but when she added cheese to the mix? Magic. This roasted Parmesan cauliflower recipe has since become a go-to in my kitchen, whether I need a quick side, a hearty vegetarian dinner, or a flavorful low-carb option.

Now, I’m thrilled to share this simple, wholesome recipe that’s big on flavor and even bigger on satisfaction. It’s perfect for busy weeknights, meal prepping, or those moments when you just want something that tastes like home.


Why You’ll Love This Roasted Parmesan Cauliflower

  • Quick & Easy: Just a few ingredients and minimal prep.
  • Versatile: Great as a side dish, snack, or vegetarian main.
  • Healthy & Wholesome: Low-carb, gluten-free, and full of fiber.
  • Deliciously Crispy: Parmesan adds a savory, crispy finish.

Ingredients

  • 1 large head cauliflower, cut into florets
  • 3 tablespoons olive oil
  • 3 garlic cloves, minced
  • ½ teaspoon salt
  • ¼ teaspoon black pepper
  • ½ cup grated Parmesan cheese

Optional Garnishes:

  • Fresh parsley, chopped
  • Lemon wedges

Step-by-Step Instructions

Step 1: Prep the Oven & Cauliflower

  1. Preheat your oven to 425°F (220°C).
  2. Line a baking sheet with parchment paper or foil for easy cleanup.
  3. Wash and thoroughly dry your cauliflower, then cut into bite-sized florets.

Step 2: Season the Florets

  1. In a large mixing bowl, toss the cauliflower with olive oil, minced garlic, salt, and pepper.
  2. Spread the seasoned cauliflower evenly on the prepared baking sheet, making sure there’s space between each floret for even roasting.

Step 3: Roast

  1. Roast in the preheated oven for 20 minutes.
  2. After 20 minutes, remove the baking sheet and sprinkle the cauliflower with the grated Parmesan.
  3. Return to the oven and roast for an additional 10–15 minutes, until the cauliflower is tender and the cheese is golden and crispy.

Step 4: Serve

  1. Garnish with chopped parsley and a squeeze of lemon juice if desired.
  2. Serve hot as a side dish or enjoy as a main with a simple salad or grain.

Tips & Variations

  • Extra Crispy: Turn on the broiler for the last 2–3 minutes for extra crunch.
  • Spicy Kick: Add a pinch of red pepper flakes to the seasoning.
  • Vegan Option: Swap Parmesan for nutritional yeast or a vegan cheese alternative.
  • Storage: Keeps well in the fridge for up to 3 days. Reheat in the oven or air fryer for best texture.

Perfect Pairings

  • Main Dishes: Pairs beautifully with grilled chicken, roasted fish, or a hearty lentil stew.
  • Sauces: Serve with garlic aioli, spicy tahini sauce, or a drizzle of balsamic glaze.
  • Beverages: Try with a crisp white wine, sparkling water with lemon, or a cold herbal iced tea.

Why Cauliflower?

Cauliflower is one of those incredible vegetables that adapts to almost any flavor profile. Roasting brings out its natural sweetness while keeping things low-carb and high in fiber. It’s ideal for anyone following a Whole30, keto, or gluten-free diet, and with the addition of garlic and Parmesan, it feels indulgent without being heavy.


Make Ahead & Storage

  • Make Ahead: Chop the cauliflower and prep your garlic up to a day in advance. Store separately and toss together before roasting.
  • Freezing: Not ideal—cauliflower tends to get soggy after thawing. Stick to fresh for best texture.
  • Leftovers: Store in an airtight container in the fridge. Reheat at 400°F for 5–7 minutes to restore crispiness.

Final Thoughts

Whether you’re new to cauliflower or already a fan, this roasted Parmesan version will win you over. It’s comfort food with a healthy twist—crispy edges, cheesy bites, and garlic in every mouthful. It’s also one of those dishes that feels elevated enough for a dinner party but easy enough for Tuesday night. Give it a try, and you’ll be hooked.

No-Bake Cheesecake: A Creamy Slice of Summer Bliss

Creamy no-bake cheesecake with fresh berries and graham cracker crust.

When summer heat makes turning on the oven feel like a crime, my grandmother’s no-bake cheesecake becomes my secret weapon. She used to whip it up on sweltering July afternoons in her little Italian kitchen, layering it with sun-ripened berries picked from her garden. Creamy, cool, and beautifully simple, this cheesecake was our go-to celebration of summer’s sweet side. Now, I pass this classic onto you, with a few tweaks to make it even easier and just as indulgent.

Whether you’re planning a picnic, hosting a party, or just craving something rich and fruity without the fuss, this no-bake cheesecake will steal the show on your dessert table. No oven, no stress—just creamy, chilled perfection.


Why You’ll Love This No-Bake Cheesecake

  • Zero Baking Required: Perfect for summer days when the last thing you want is a hot kitchen.
  • Quick & Simple: Only a handful of ingredients and a few steps.
  • Customizable: Add your favorite fruit toppings or leave it plain—either way, it’s heavenly.
  • Crowd-Pleasing Texture: Light, fluffy, and irresistibly creamy.

Ingredients

For the Crust:

  • 2 cups graham cracker crumbs
  • ½ cup unsalted butter, melted
  • 2 tablespoons granulated sugar

For the Filling:

  • 16 oz cream cheese, softened
  • ⅔ cup granulated sugar
  • 1 teaspoon vanilla extract
  • 1 cup cold heavy whipping cream

Optional Toppings:

  • Fresh berries (strawberries, blueberries, raspberries)
  • Fruit compote or jam
  • Lemon zest or mint leaves for garnish

Step-by-Step Instructions

Step 1: Prepare the Crust

  1. In a medium mixing bowl, combine graham cracker crumbs and 2 tablespoons of sugar.
  2. Pour in the melted butter and mix until the crumbs are evenly moistened.
  3. Press the mixture firmly into the bottom of a 6-inch springform pan (for one generous serving or two smaller ones).
  4. Use the bottom of a glass or spoon to smooth and compress the crust.
  5. Chill the crust in the fridge while you make the filling.

Step 2: Make the Cheesecake Filling

  1. In a large bowl, beat the softened cream cheese until smooth and creamy.
  2. Add the granulated sugar and vanilla extract. Continue beating until fully combined and fluffy.
  3. In a separate bowl, whip the heavy cream until stiff peaks form.
  4. Gently fold the whipped cream into the cream cheese mixture, being careful not to deflate the air you’ve whipped in.

Step 3: Assemble & Chill

  1. Spoon the cheesecake filling over the prepared crust.
  2. Smooth the top with a spatula or back of a spoon.
  3. Cover with plastic wrap and refrigerate for at least 4 hours, or until set. Overnight is even better for maximum flavor and firmness.

Step 4: Add Your Toppings

  1. Just before serving, top your cheesecake with fresh berries or your favorite fruit topping.
  2. Garnish with a sprig of mint or a little lemon zest for a fresh finish.

Tips & Tricks for the Best No-Bake Cheesecake

  • Softened Cream Cheese: Make sure your cream cheese is fully softened to avoid lumps.
  • Whipping Cream Matters: Use heavy cream, not milk or half-and-half, and whip it until stiff peaks form.
  • Chill Time is Key: Don’t rush it—give your cheesecake plenty of time to firm up in the fridge.
  • Make It Yours: Try a chocolate cookie crust, add citrus zest to the filling, or drizzle with caramel for variety.

Perfect Pairings

  • Beverage: Enjoy with a glass of Moscato, iced espresso, or a berry lemonade.
  • Serving Idea: Pair it with shortbread cookies or serve in a mini jar for a picnic-friendly twist.
  • For the Sweet Tooth: Add a layer of Nutella between the crust and filling.

Make Ahead & Storage

  • Make Ahead: This cheesecake can be prepared a day in advance and topped just before serving.
  • Storage: Keep leftovers covered in the fridge for up to 3 days. Not suitable for freezing, as the texture may change.

Final Thoughts

This no-bake cheesecake is everything a summer dessert should be—light, luscious, and so simple you’ll find yourself making it again and again. Whether you’re a beginner in the kitchen or a seasoned home baker, this creamy treat will bring a slice of joy to your summer gatherings. Try it, share it, and don’t forget to tag your creations with #nobake #cheesecake #dessertlover and more!

Brown Butter Coconut Cookies: Crispy Edges, Soft Centers, and Irresistible Coconut Flavor

Golden brown coconut cookies with crispy edges and soft centers on a cooling rack.

Growing up, the kitchen always smelled of something sweet—especially when my grandmother baked her famous butter cookies. But it wasn’t until I started playing with ingredients myself that I discovered the magic of brown butter and its rich, nutty flavor. Combine that with the tropical notes of sweetened coconut, and you get a cookie that’s crisp on the edges, soft in the center, and dangerously addictive.

These Brown Butter Coconut Cookies are a love letter to homemade goodness. Whether you’re hosting a winter gathering or packing treats for a summer picnic, these golden morsels fit any occasion.


Why You’ll Love These Cookies

  • Rich & Buttery: Browning the butter takes the flavor to a whole new level.
  • Perfect Texture: Crispy edges and soft centers, just like cookies should be.
  • Tropical Sweetness: Shredded coconut adds chewiness and natural sweetness.
  • Easy to Make: Simple pantry ingredients and no fancy equipment needed.
  • Make-Ahead Friendly: Store or freeze the dough for cookie cravings any time.

Ingredients (Makes about 24 cookies)

  • 1 cup unsalted butter
  • 1¼ cups granulated sugar
  • 1 large egg
  • 1 teaspoon vanilla extract
  • 2 cups all-purpose flour
  • ½ teaspoon baking soda
  • ½ teaspoon salt
  • 1½ cups sweetened shredded coconut

Prep Time: 15 minutes

Chill Time: 30 minutes

Bake Time: 10–12 minutes

Total Time: 55 minutes


How to Make Brown Butter Coconut Cookies

Step 1: Brown the Butter

In a medium saucepan, melt the butter over medium heat. Stir constantly until the butter foams, then turns golden and releases a nutty aroma. Immediately remove from heat and pour into a bowl to cool slightly.

Tip: Don’t walk away—brown butter can turn to burnt butter quickly.


Step 2: Mix the Wet Ingredients

Once the brown butter is warm (not hot), beat in the sugar until well combined. Add the egg and vanilla extract. Mix until smooth and glossy.


Step 3: Combine the Dry Ingredients

In a separate bowl, whisk together the flour, baking soda, and salt. Slowly mix the dry ingredients into the wet, stirring until just combined.


Step 4: Fold in the Coconut

Gently fold in the shredded coconut. The dough will be soft and slightly sticky.


Step 5: Chill the Dough

Cover the dough and refrigerate for at least 30 minutes. Chilling helps the flavors develop and prevents the cookies from spreading too much.


Step 6: Bake to Golden Perfection

Preheat oven to 350°F (175°C). Line baking sheets with parchment paper. Scoop tablespoon-sized balls of dough and place them 2 inches apart.

Bake for 10–12 minutes, or until the edges are golden and the centers look set. Let cool on the tray for 5 minutes before transferring to a wire rack.


Serving Suggestions

These cookies are divine on their own, but you can also:

  • Pair with a glass of cold milk or a coconut latte
  • Serve alongside a fruit platter for a brunch table
  • Crumble over vanilla ice cream for a decadent dessert

Variations & Tips

  • Add a Twist: Mix in a handful of chopped white chocolate or toasted almonds.
  • Make it Dairy-Free: Use a dairy-free butter alternative that browns well.
  • Store Smart: Keep cookies in an airtight container at room temp for up to 5 days—or freeze the dough for up to 3 months.
  • Smaller Batch? Halve the ingredients and follow the same steps.

Why Brown Butter?

Brown butter isn’t just melted butter—it’s caramelized magic. The milk solids toast and deepen in flavor, adding a nutty, toffee-like richness that elevates any baked good. In these cookies, it balances the coconut’s sweetness perfectly, making each bite complex and satisfying.


External Links for Baking Inspiration


Final Notes

These Brown Butter Coconut Cookies are everything a cookie should be: rich, chewy, crisp-edged, and deeply flavorful. Whether you’re baking for a party, a sweet snack stash, or simply to fill your home with that nostalgic aroma of baked coconut and butter—this is your go-to recipe.

Made Them?

Tag your creations with #cookieheaven and #bakingjoy—I’d love to see your sweet successes!

Apple Pie Cheesecake: A Cozy Winter Twist on Two Classic American Desserts

A slice of apple pie cheesecake topped with cinnamon apples and a buttery crumble, served on a white plate.

There are few things more comforting on a chilly winter day than the scent of apples and cinnamon baking in the oven. For me, it takes me back to my grandmother’s kitchen in upstate New York, where she’d bake apple pies with fruit we picked ourselves every fall. Later, I’d bring in my own twist—layering her sweet, spiced apple filling over a creamy cheesecake base. And just like that, Apple Pie Cheesecake was born—a dessert that perfectly fuses two beloved American classics into one indulgent treat.

This dessert is all about warmth and comfort. The crisp, buttery graham cracker crust, smooth vanilla cheesecake, and gooey cinnamon-apple topping combine to create a bite that feels like a warm hug. It’s the perfect finish to a winter dinner party, Thanksgiving meal, or any time you’re craving something sweet and nostalgic.


Why You’ll Love This Apple Pie Cheesecake

  • Comforting Winter Flavors: Apples, cinnamon, and nutmeg bring that cozy holiday feel.
  • Make-Ahead Friendly: Perfect for prepping the night before.
  • Great for a Crowd: Serves 8–10 people and holds its shape beautifully.
  • Classic Americana: A true fusion of two iconic American desserts.

Ingredients

For the Graham Cracker Crust:

  • 1 ½ cups graham cracker crumbs (about 10–12 crackers)
  • ¼ cup granulated sugar
  • ½ cup unsalted butter, melted
  • ½ tsp cinnamon

For the Cheesecake Filling:

  • 3 packages (8 oz each) cream cheese, softened
  • ¾ cup granulated sugar
  • 1 tsp vanilla extract
  • 3 large eggs
  • ½ cup sour cream
  • 2 tbsp all-purpose flour
  • ½ tsp ground cinnamon

For the Apple Pie Topping:

  • 3 medium apples (Granny Smith or Honeycrisp), peeled and sliced
  • 2 tbsp unsalted butter
  • ⅓ cup light brown sugar
  • 1 tsp ground cinnamon
  • ¼ tsp ground nutmeg
  • 2 tsp cornstarch
  • 2 tbsp water
  • 1 tsp vanilla extract

Optional Garnish:

  • Whipped cream
  • Caramel drizzle
  • Crushed graham crackers

Equipment You’ll Need

  • 9-inch springform pan
  • Stand mixer or hand mixer
  • Mixing bowls
  • Medium saucepan
  • Spatula
  • Cooling rack

Step-by-Step Instructions

1. Prepare the Crust

  1. Preheat your oven to 325°F (160°C).
  2. In a bowl, mix together graham cracker crumbs, sugar, cinnamon, and melted butter until the crumbs are fully coated.
  3. Press the mixture firmly into the bottom of a greased 9-inch springform pan. Use the back of a measuring cup for a smooth, even surface.
  4. Bake the crust for 10 minutes. Remove and let cool slightly.

2. Make the Cheesecake Filling

  1. In a large mixing bowl, beat the softened cream cheese until smooth and creamy.
  2. Add sugar, vanilla, flour, and cinnamon. Beat until fully incorporated.
  3. Add eggs one at a time, mixing on low speed and scraping down the sides as needed.
  4. Fold in the sour cream until smooth.
  5. Pour the cheesecake filling over the crust and smooth the top.

3. Bake the Cheesecake

  1. Place the springform pan on a baking sheet. Bake at 325°F (160°C) for 55–65 minutes, or until the center is slightly jiggly but set.
  2. Turn off the oven, crack the door open, and let the cheesecake cool in the oven for 1 hour to prevent cracks.
  3. Transfer to a wire rack and cool completely before refrigerating for at least 4 hours (preferably overnight).

4. Make the Apple Pie Topping

  1. In a medium saucepan over medium heat, melt butter. Add sliced apples, brown sugar, cinnamon, and nutmeg.
  2. Cook for 5–7 minutes, stirring occasionally, until apples are tender but not mushy.
  3. Stir in the cornstarch mixed with water and cook until the mixture thickens, about 2 minutes.
  4. Remove from heat, stir in vanilla, and let cool to room temperature.

5. Assemble and Serve

  1. Once the cheesecake is fully chilled, spoon the cooled apple topping evenly over the top.
  2. Garnish with whipped cream or a drizzle of caramel if desired.
  3. Slice and serve!

Make It Ahead

This Apple Pie Cheesecake is an ideal make-ahead dessert. Simply bake and chill the cheesecake a day in advance, and prep the apple topping separately. Assemble just before serving to maintain the topping’s freshness and texture.


Tips for the Perfect Apple Pie Cheesecake

  • Room Temperature Ingredients: Ensure your cream cheese, eggs, and sour cream are at room temperature for a smooth, lump-free batter.
  • No Cracks Please: Don’t overmix the batter and avoid opening the oven while baking.
  • Chill Time: Let the cheesecake chill for at least 4 hours. Overnight is best.
  • Apple Variety: Use tart apples like Granny Smith to balance the sweetness of the cheesecake.

Variations

  • Apple Crumble Cheesecake: Add a buttery crumble topping over the apples before serving.
  • Salted Caramel Apple Cheesecake: Drizzle homemade or store-bought salted caramel sauce on top.
  • Mini Cheesecakes: Use a muffin tin for personal-sized versions, perfect for parties.

Pairing Suggestions

This dessert pairs wonderfully with:

  • Spiced Chai Latte or Hot Apple Cider: For that full winter experience.
  • Sweet Dessert Wine: Such as Riesling or Moscato.
  • Vanilla Ice Cream: If you’re feeling extra indulgent.

Storage Instructions

  • Refrigerator: Store covered in the fridge for up to 5 days.
  • Freezer: Freeze individual slices wrapped tightly in plastic and foil for up to 2 months. Thaw in the refrigerator before serving.

Reader’s Corner

Have you tried this Apple Pie Cheesecake recipe? Did you add your own twist—maybe a different spice or a pecan crust? I’d love to hear your take! Share your version in the comments below or tag your photo with #CozyKitchenWithSarah on Instagram!


External Resources

Here are some useful links for deeper dives:

Jalapeño Popper Grilled Cheese: A Spicy Summer Comfort Classic

Crispy grilled cheese sandwich filled with jalapeños and melted cheddar.

There’s something magical about grilled cheese sandwiches. For me, they bring back memories of lazy summer lunches with my Nonna in the countryside, where even the simplest ingredients were turned into something unforgettable. This Jalapeño Popper Grilled Cheese is my modern twist on that nostalgic classic—a spicy, creamy, melty masterpiece inspired by the bold flavors of jalapeño poppers and the irresistible crunch of golden grilled bread.

Whether you’re cooking for yourself or indulging in a quick, flavorful bite between summer adventures, this sandwich is the ultimate solo treat. And the best part? It’s ready in minutes.


Why You’ll Love This Recipe

  • Spicy & Cheesy: Combines the heat of jalapeños with a trio of rich cheeses.
  • Quick & Easy: Ideal for solo summer meals or when you need a comfort food fix.
  • Customizable: Add crispy bacon for an extra indulgent layer—or leave it out for a vegetarian delight.
  • Perfectly Portable: Great for lunch breaks, picnics, or any time you crave flavorful bites.

Ingredients (Serves 1)

  • 4 slices of bread (your choice: sourdough, whole wheat, or white)
  • 4 tablespoons cream cheese, softened
  • 1 cup shredded cheddar cheese
  • 2 jalapeños, finely chopped (remove seeds for a milder heat)
  • 4 slices cooked bacon (optional)
  • 2 tablespoons unsalted butter, softened

Prep Time: 5 minutes

Cook Time: 5-7 minutes

Total Time: 10-12 minutes


Step-by-Step Instructions

1. Prep Your Filling

In a small bowl, mix the cream cheese, shredded cheddar, and chopped jalapeños. If you’re adding bacon, crumble it into the mix or layer it whole between the cheese for even bites of smoky goodness.

Tip: Want it even cheesier? Add a touch of mozzarella or pepper jack for a deeper melt.


2. Assemble the Sandwich

Spread the butter on one side of each slice of bread—this will be the outside that gets golden and crispy.

Lay two slices of bread, butter side down, on a cutting board. Spread the jalapeño popper mixture evenly on top. Place the remaining bread slices on top, butter side up.


3. Grill to Perfection

Heat a non-stick skillet or griddle over medium heat. Place your sandwich onto the skillet and press it down slightly with a spatula for that classic crispy finish.

Grill for about 2–3 minutes on each side, or until the bread is golden brown and the cheese inside is fully melted.

Pro Tip: Cover the skillet briefly with a lid to help melt the cheese faster without burning the bread.


4. Slice & Serve

Transfer the grilled cheese to a plate and let it rest for a minute. Slice in half to reveal that cheesy, spicy core—and get ready for melty perfection in every bite.


Summer Pairing Ideas

  • Serve with: A cold cucumber salad, a slice of watermelon, or a zesty corn on the cob.
  • Drink: Try a sparkling lemonade, mango iced tea, or even a chilled kombucha to balance the spice.

Make It Yours

Low Heat? Skip the seeds in the jalapeños or use sweet peppers instead.

Extra Crunch? Add crushed tortilla chips inside for texture.

Bread Swap? Go gourmet with ciabatta, or keep it classic with thick-cut white.

No Butter? Olive oil works great for grilling too.


Why This Sandwich Works

This grilled cheese hits all the right notes—spicy from the jalapeños, rich from the cream cheese, sharp from the cheddar, and perfectly crispy thanks to the buttered bread. It’s the kind of simple summer recipe that feels like a treat every single time.

Whether you’re cooking for yourself or making a quick bite on a warm day, this sandwich never fails to satisfy. My Nonna would probably raise an eyebrow at the jalapeños, but I like to think she’d appreciate the creative twist.


External Links for Inspiration & Pairings


Final Thoughts

Craving comfort food with a kick? This Jalapeño Popper Grilled Cheese is the answer. It’s summer-approved, bursting with flavor, and just the right size for a quick solo indulgence.

Fish Taco Slaw Recipe (Mexican-Inspired & Irresistibly Fresh)

Three fish tacos with crispy fish fillets and vibrant coleslaw, served on soft corn tortillas with a side of slaw.

There’s something magical about biting into a warm, lightly fried fish taco piled high with vibrant, crunchy slaw. The contrast between crispy, tender fish and the refreshing coolness of slaw is a summer dream come true—especially if you’re lounging seaside or just daydreaming about it.

This Fish Taco Slaw recipe comes straight from my memories of cooking with my grandmother in our sunny kitchen. Although her roots were Italian, she loved exploring global flavors, and fish tacos quickly became a family favorite on hot days. She always said, “Slaw is like music—it brings everything together.”

In this article, we’ll walk through a mouthwatering, easy-to-follow recipe that captures the essence of Mexican fish tacos, layered with a crisp cabbage slaw, creamy sauce, and bold lime flavor. Ready to bring some sunshine to your plate?


🐟 Why You’ll Love This Fish Taco Slaw

  • Light & healthy: Perfect for summer meals or beachside picnics.
  • Full of Mexican flavor: Lime, cilantro, cumin, and chili come together beautifully.
  • Quick & easy: Under 30 minutes from prep to plate.
  • Flexible: Make it gluten-free, dairy-free, or spicy with simple swaps.
  • Family-friendly: Loved by kids and adults alike!

🧺 Ingredients You’ll Need

For the Fish:

  • 1.5 lbs of white fish fillets (cod or tilapia work great)
  • Juice of 1 lime
  • 1 tsp ground cumin
  • 1 tsp smoked paprika
  • ½ tsp garlic powder
  • ½ tsp chili powder (adjust for heat)
  • Salt and pepper to taste
  • 2 tbsp olive oil (for pan-frying or grilling)

For the Fish Taco Slaw:

  • 3 cups finely shredded green cabbage
  • 1 cup shredded purple cabbage
  • 1 medium carrot, julienned or shredded
  • ¼ cup red onion, thinly sliced
  • ½ cup fresh cilantro, chopped
  • Juice of 2 limes
  • 2 tbsp apple cider vinegar
  • 1 tbsp honey or agave nectar
  • Salt and pepper to taste

For the Creamy Sauce:

  • ½ cup sour cream or Greek yogurt
  • 2 tbsp mayonnaise
  • 1 tbsp lime juice
  • 1 tsp hot sauce (optional)
  • 1 small garlic clove, minced
  • Pinch of salt

To Assemble:

  • 8 small corn or flour tortillas
  • Extra lime wedges, sliced radishes, avocado (optional toppings)

⏱️ Prep & Cook Time

  • Prep time: 15 minutes
  • Cook time: 10 minutes
  • Total time: 25 minutes

🍴 Instructions

Step 1: Marinate the Fish

In a bowl, combine the lime juice, cumin, paprika, garlic powder, chili powder, salt, and pepper. Pat your fish fillets dry and rub the marinade over them. Let sit for at least 10 minutes—just enough to absorb those summery flavors.

Step 2: Make the Slaw

In a large bowl, mix the green cabbage, purple cabbage, carrot, red onion, and cilantro. In a small bowl, whisk together lime juice, apple cider vinegar, honey, salt, and pepper. Pour over the slaw and toss until well coated. Let it rest in the fridge while you cook the fish—this helps it develop crunch and flavor.

Step 3: Cook the Fish

Heat olive oil in a skillet over medium-high heat. Cook the fish fillets for 3–4 minutes per side, or until they flake easily with a fork and are lightly golden. Alternatively, grill them on a hot grill or bake at 400°F (200°C) for about 10–12 minutes.

Once cooked, break the fish into bite-sized pieces.

Step 4: Make the Sauce

In a bowl, whisk together sour cream (or yogurt), mayo, lime juice, garlic, and hot sauce (if using). Taste and adjust seasoning. This creamy sauce is the glue that binds all the bold flavors together!

Step 5: Warm the Tortillas

Quickly toast your tortillas in a dry skillet or on the grill for about 30 seconds per side. Wrap them in a clean towel to keep warm.

Step 6: Assemble the Tacos

Layer each tortilla with a spoonful of fish, a generous heap of slaw, and a drizzle of creamy sauce. Add avocado slices or radishes if you like, and finish with a squeeze of fresh lime.


🌽 Tips & Substitutions

  • Fish options: Mahi-mahi, halibut, or snapper work wonderfully too.
  • Make it spicy: Add jalapeños to the slaw or chili flakes to the fish rub.
  • No mayo? Use all Greek yogurt for a tangier sauce.
  • Tortilla tip: Double up on tortillas for a sturdier taco.

🥗 What to Serve With Fish Taco Slaw

Pair your tacos with:

  • Mexican street corn (Elote) – grilled corn with cotija, lime, and chili
  • Mango salsa – adds a sweet-tart kick
  • Chilled Mexican beer or lime agua fresca
  • Cilantro-lime rice for a fuller meal

💡 Make It Ahead

You can prep the slaw and sauce up to a day ahead—just keep them chilled. The fish is best cooked fresh, but you can marinate it ahead of time for quick assembly later.


🇲🇽 A Nod to Baja

Fish tacos have roots in the Baja California peninsula of Mexico, where the Pacific’s bounty meets vibrant street food culture. Typically battered and fried, the modern twist includes grilled versions with slaw for a healthier edge—just like this recipe. The mix of textures and zesty lime is what makes Fish Taco Slaw an unforgettable experience, especially during sun-soaked summer days.


📌 Final Thoughts

This Fish Taco Slaw recipe is a love letter to coastal summers and bold Mexican flavors. It’s healthy, vibrant, and totally customizable—perfect for a weeknight dinner or a backyard fiesta.

Don’t be surprised if these tacos become a regular in your rotation. Once you try them, you’ll understand why slaw is never just a side—it’s the star.


📲 Share the Love

Tried this recipe? I’d love to hear how it turned out! Snap a pic, tag me on Instagram, or drop a comment below. Let’s taco ’bout it! 🌮💬


🔗 External Links

Here are some helpful resources to explore more:

Vegan Coconut Tofu Soup – A Summer Hug in a Bowl

Crispy tofu stir-fried with peppers, zucchini, peanuts, and spicy Kung Pao sauce

There’s something deeply comforting about a warm, fragrant bowl of soup—even in summer. My grandmother used to say, “A good bowl of soup can fix a tired soul,” and I wholeheartedly agree. Inspired by her wisdom and my love for vibrant Asian flavors, this Vegan Coconut Tofu Soup is everything you want in a plant-based meal: creamy, spicy, nourishing, and absolutely soul-satisfying.

This recipe combines the soothing creaminess of coconut milk, the heat from red curry paste, and the earthy richness of mushrooms, with protein-packed tofu and fresh summer greens. It’s light enough for a hot day but hearty enough to feel like a full meal. Plus, it’s gluten-free, dairy-free, and packed with immunity-boosting ingredients. Let’s get cooking!


Why You’ll Love This Vegan Coconut Tofu Soup

  • 🌿 Plant-Based Protein: Tofu provides a satisfying protein source for vegetarians and vegans.
  • 🌶️ Spicy & Flavorful: The red curry paste adds a delightful kick.
  • 🥥 Creamy without Dairy: Coconut milk creates a silky, rich broth.
  • 🍃 Detox-Friendly: Ginger, garlic, and spinach support immune health.
  • 🥣 One-Pot Simplicity: Quick, easy, and minimal clean-up.

Ingredients

Here’s what you’ll need to make one hearty serving:

  • 1 tablespoon coconut oil (or olive oil)
  • 1 small onion, diced
  • 3 cloves garlic, minced
  • 1 tablespoon fresh ginger, grated
  • 1 tablespoon red curry paste (adjust to taste)
  • 4 cups vegetable broth
  • 1 can (14 oz) full-fat coconut milk
  • 1 tablespoon soy sauce (or tamari for gluten-free option)
  • 1 tablespoon lime juice
  • 1 teaspoon maple syrup (optional, to balance heat)
  • 1 block firm tofu, pressed and cubed
  • 2 cups mushrooms, sliced (shiitake or cremini work best)
  • 2 cups baby spinach
  • Salt and pepper to taste
  • Fresh cilantro and lime wedges, for garnish

Instructions

Step 1: Prepare the Tofu

  1. Press the tofu for at least 15 minutes to remove excess moisture.
  2. Cut into cubes and set aside. You can pan-fry it for extra texture, but it’s just as delicious added straight to the soup.

Step 2: Sauté the Aromatics

  1. Heat the coconut oil in a large pot over medium heat.
  2. Add diced onion and sauté for 3-4 minutes until translucent.
  3. Stir in garlic and ginger; cook for another minute until fragrant.

Step 3: Add the Spice

  1. Stir in the red curry paste and cook for 1-2 minutes to bloom the flavors.

Step 4: Build the Broth

  1. Pour in vegetable broth and bring to a gentle boil.
  2. Add coconut milk, soy sauce, lime juice, and maple syrup.
  3. Stir well and lower heat to a simmer.

Step 5: Add Vegetables & Tofu

  1. Add mushrooms and tofu cubes. Simmer for 10 minutes, allowing flavors to meld.
  2. Toss in the baby spinach just before serving. It wilts quickly and adds freshness.

Step 6: Season & Serve

  1. Taste and adjust with salt, pepper, or more lime juice if needed.
  2. Ladle into a bowl, top with fresh cilantro and a wedge of lime.

Tips for the Perfect Vegan Coconut Tofu Soup

  • Want a gluten-free option? Use tamari instead of soy sauce.
  • For extra protein and texture, air-fry or pan-sear your tofu before adding.
  • Add more veggies like julienned carrots, bell peppers, or bean sprouts for extra crunch.
  • Make it spicy by adding a dash of chili oil or sliced fresh chilies.

Variations to Try

  • Noodle Bowl: Add rice noodles or glass noodles to make it more filling.
  • Lemongrass Infusion: Simmer lemongrass stalks in the broth for a citrusy twist.
  • Creamier Version: Use two cans of coconut milk and reduce broth for a thicker soup.

Health Benefits

This vegan coconut tofu soup isn’t just delicious—it’s packed with wellness-boosting ingredients:

  • Ginger & Garlic: Great for digestion and immunity.
  • Coconut Milk: Contains healthy fats that promote brain function.
  • Spinach: Loaded with vitamins A, C, and iron.
  • Tofu: A versatile source of plant-based protein and calcium.

Serving Suggestions

Pair it with:

  • Steamed jasmine rice or a small bowl of quinoa.
  • A crunchy cucumber salad dressed with rice vinegar and sesame oil.
  • Chilled herbal tea or a sparkling lime drink.

Reader Favorites

If you loved this, check out these other cozy, plant-powered bowls:


Final Thoughts

This Vegan Coconut Tofu Soup is like wrapping yourself in a summer breeze with a spicy kick. It’s comforting, healthful, and oh-so-simple—perfect for a weeknight dinner or a light weekend lunch. Try it once, and I promise it’ll earn a spot in your regular rotation.

Don’t forget to tag your creations with #vegansoup and #coconutsoup—I’d love to see your beautiful bowls!

Creamy Fettuccine Alfredo with Shrimp and Chicken (Italian Winter Comfort Food)

Plate of creamy fettuccine Alfredo with shrimp and grilled chicken, garnished with black pepper and set on a textured cloth.

There’s something irresistibly comforting about a warm bowl of pasta in the heart of winter. As the chill seeps into the bones, few dishes bring the kind of cozy satisfaction that a creamy fettuccine alfredo with shrimp and chicken does. This dish, rooted in Italian-American cuisine, has always been a favorite at our family table—especially during the colder months.

My grandmother, Nonna Rosa, used to say that a rich, creamy Alfredo sauce was the culinary equivalent of a warm blanket. Her version, which inspired this recipe, was always made from scratch, with just the right balance of cream, butter, and Parmigiano-Reggiano. Over the years, I’ve added my own twist with tender chicken and succulent shrimp for an indulgent yet balanced winter pasta dish.

Let’s dive into this hearty, flavor-packed fettuccine alfredo with shrimp and chicken that’s perfect for a cozy night in.


Why You’ll Love This Fettuccine Alfredo

  • Rich and Creamy: The sauce is luscious and clings perfectly to the pasta.
  • Protein-Packed: Juicy chicken and shrimp make this meal satisfying and complete.
  • Winter Comfort: Ideal for cold weather, this dish warms you from the inside out.
  • Restaurant Quality at Home: Impress your guests or treat yourself without leaving your kitchen.

Ingredients (Serves 3)

For the Pasta:

  • 300g (10.5 oz) fettuccine pasta
  • Salted water for boiling

For the Chicken:

  • 1 large chicken breast, sliced into strips
  • Salt and freshly ground pepper, to taste
  • ½ tsp Italian seasoning
  • 1 tbsp olive oil

For the Shrimp:

  • 200g (7 oz) large shrimp, peeled and deveined
  • Salt and pepper, to taste
  • 1 tbsp butter
  • 1 clove garlic, minced

For the Alfredo Sauce:

  • 2 tbsp unsalted butter
  • 2 cloves garlic, finely minced
  • 1 cup heavy cream
  • ¾ cup freshly grated Parmigiano-Reggiano
  • ¼ tsp freshly ground black pepper
  • Pinch of nutmeg (optional)
  • Salt, to taste

Garnish:

  • Fresh parsley, chopped
  • Extra grated Parmesan

Preparation Steps

1. Cook the Fettuccine

  1. Bring a large pot of salted water to a boil.
  2. Add the fettuccine and cook according to package instructions until al dente.
  3. Reserve ½ cup of pasta water, then drain and set aside.

2. Sear the Chicken

  1. Season the sliced chicken with salt, pepper, and Italian seasoning.
  2. Heat olive oil in a skillet over medium heat.
  3. Cook chicken pieces for about 4–5 minutes on each side, until golden brown and fully cooked.
  4. Remove from the pan and set aside.

3. Cook the Shrimp

  1. In the same pan, melt butter over medium heat.
  2. Add minced garlic and sauté for 30 seconds.
  3. Add the shrimp, season with salt and pepper, and cook for 2 minutes per side or until pink and opaque.
  4. Transfer shrimp to a plate and keep warm.

4. Make the Alfredo Sauce

  1. In a separate saucepan, melt butter over medium-low heat.
  2. Add garlic and cook gently for about a minute until fragrant.
  3. Pour in the heavy cream, stirring continuously.
  4. Once the cream is warm (not boiling), stir in the grated Parmigiano-Reggiano.
  5. Mix until the cheese has melted into a velvety sauce.
  6. Season with black pepper, a pinch of nutmeg, and salt to taste.

Tip: If the sauce gets too thick, stir in a little reserved pasta water to loosen it.


5. Bring It All Together

  1. Add the cooked pasta to the Alfredo sauce and toss to coat.
  2. Gently fold in the seared chicken and cooked shrimp.
  3. Allow everything to heat through for 2–3 minutes on low heat.

6. Serve and Garnish

  1. Divide the pasta among three warm plates.
  2. Sprinkle with chopped parsley and extra Parmesan.
  3. Serve immediately with crusty bread or a light green salad.

Tips for Perfect Fettuccine Alfredo with Shrimp and Chicken

  • Use Freshly Grated Cheese: Pre-shredded Parmesan often contains anti-caking agents that don’t melt as well.
  • Don’t Overcook the Shrimp: They cook fast—watch for the moment they turn pink and curl.
  • Control the Heat: Keep your sauce on medium-low to avoid curdling or burning the cream.
  • Reserve Pasta Water: This starchy liquid is great for adjusting the sauce consistency.

Variations & Substitutions

  • Light Version: Substitute half-and-half for heavy cream and use grilled chicken for a leaner dish.
  • Vegetarian Option: Skip the meat and add sautéed mushrooms or steamed broccoli.
  • Spicy Twist: Add a pinch of red chili flakes to the sauce for a gentle heat.

Wine Pairing Suggestions

A glass of Chardonnay or Pinot Grigio pairs beautifully with this rich dish. The bright acidity cuts through the creaminess, while the citrus notes complement the shrimp.


Storage and Reheating Tips

  • Storage: Refrigerate leftovers in an airtight container for up to 2 days.
  • Reheat Gently: Use a skillet over low heat and add a splash of cream or milk to restore creaminess.
  • Avoid the Microwave: It tends to separate the sauce.

The Story Behind the Dish

This fettuccine alfredo with shrimp and chicken has been a staple at our winter gatherings for years. I remember serving it on Christmas Eve when Nonna couldn’t travel due to the snow. She took one bite, smiled, and said, “Even better than the trattoria in Florence.” That compliment has stayed with me ever since—and now I share this treasured recipe with you, hoping it brings the same joy to your winter evenings.


Invite Your Readers

Have you tried this fettuccine alfredo with shrimp and chicken recipe? Let me know how it turned out! Did you add your own twist? Tag your creations with #PastaWithSarah on Instagram—I’d love to see your delicious plates!


External Resources for Further Inspiration

Kung Pao Tofu – A Spicy, Plant-Based Stir-Fry That Hits the Spot

Crispy tofu stir-fried with peppers, zucchini, peanuts, and spicy Kung Pao sauce

Growing up in a family where dinner time meant bold flavors and sizzling pans, Kung Pao was always a household favorite. My Italian grandmother might have ruled the kitchen with her pasta and risottos, but it was my aunt’s pan-seared tofu with fiery sauces that first introduced me to the power of Asian comfort food. This Kung Pao Tofu recipe is my tribute to those spicy, cozy nights and a nod to wholesome, plant-based living. Whether you’re craving takeout flavors at home or looking for a quick meatless Monday dinner, this dish delivers a punch of taste with every crispy, saucy bite.


Why You’ll Love This Kung Pao Tofu

  • Packed with vegan protein
  • Ready in under 30 minutes
  • Perfect for both summer and winter meals
  • Made with whole food ingredients
  • Spicy, sweet, and savory with a satisfying crunch

Ingredients for One Serving

Here’s everything you’ll need to whip up this spicy stir-fry delight:

Tofu & Veggies:

  • 1 block (14 oz) firm tofu, pressed and cubed
  • 1 tablespoon cornstarch
  • 2 tablespoons vegetable oil
  • 1 red bell pepper, chopped
  • 1 green bell pepper, chopped
  • 1 zucchini, chopped
  • ½ cup dry roasted peanuts
  • 4 dried red chilies (optional for heat)
  • 3 green onions, chopped

For the Sauce:

  • 2 tablespoons soy sauce
  • 1 tablespoon rice vinegar
  • 1 tablespoon maple syrup or agave
  • 1 teaspoon sesame oil
  • 1 teaspoon fresh ginger, grated
  • 1 clove garlic, minced
  • ½ teaspoon cornstarch (for thickening)
  • 1 tablespoon water

Step-by-Step Instructions

Step 1: Press and Prep the Tofu

Start by pressing your tofu for at least 15 minutes to remove excess moisture. This step is crucial for getting that golden, crispy crust. Once pressed, cut the tofu into bite-sized cubes and toss them in 1 tablespoon of cornstarch.

💡 Tip: Use a tofu press or sandwich the block between paper towels and heavy books.

Step 2: Crisp Up the Tofu

Heat the vegetable oil in a skillet over medium-high heat. Add the tofu cubes in a single layer and cook until all sides are golden brown and crispy, about 8–10 minutes. Remove and set aside.

Step 3: Sauté the Veggies

In the same pan, add a splash more oil if needed. Toss in the red and green bell peppers and zucchini. Stir-fry for 3–4 minutes until the vegetables are tender but still crisp. Add the dried chilies (if using) and sauté for another minute.

Step 4: Mix the Sauce

In a small bowl, whisk together all the sauce ingredients: soy sauce, rice vinegar, maple syrup, sesame oil, garlic, ginger, cornstarch, and water. Mix well until smooth.

Step 5: Bring It All Together

Return the tofu to the pan with the veggies. Pour in the sauce and stir continuously for 2–3 minutes until everything is evenly coated and the sauce thickens. Add the peanuts and green onions last, giving it a final toss.


How to Serve

This dish is hearty enough to enjoy on its own, but it’s even more satisfying when served with:

  • Steamed jasmine or brown rice
  • Stir-fried noodles
  • Cauliflower rice for a low-carb twist

Substitutions & Variations

  • Nut-free: Replace peanuts with toasted sunflower seeds or omit entirely.
  • Low-sodium: Use low-sodium soy sauce or tamari.
  • More heat? Add chili flakes or Sriracha to the sauce.

Storage Tips

Store leftovers in an airtight container in the refrigerator for up to 3 days. Reheat in a skillet for best texture.


Nutrition Highlights (Approximate per serving)

  • Calories: 420
  • Protein: 24g
  • Carbs: 30g
  • Fat: 24g
  • Fiber: 5g

External Links to Explore


Final Thoughts

Kung Pao Tofu is that rare weeknight dish that manages to feel indulgent and healthy at the same time. It’s fast, full of flavor, and endlessly adaptable. Try it once, and it might just become your new favorite vegan comfort food. If you’ve made this recipe, I’d love to hear how it turned out! Share your version in the comments or tag me on Instagram with #crispyskillettofu.