Chickpea and Cucumber Salad – A Fresh Mediterranean Delight

A bowl of Mediterranean chickpea and cucumber salad with fresh herbs and lemon wedges on the side.

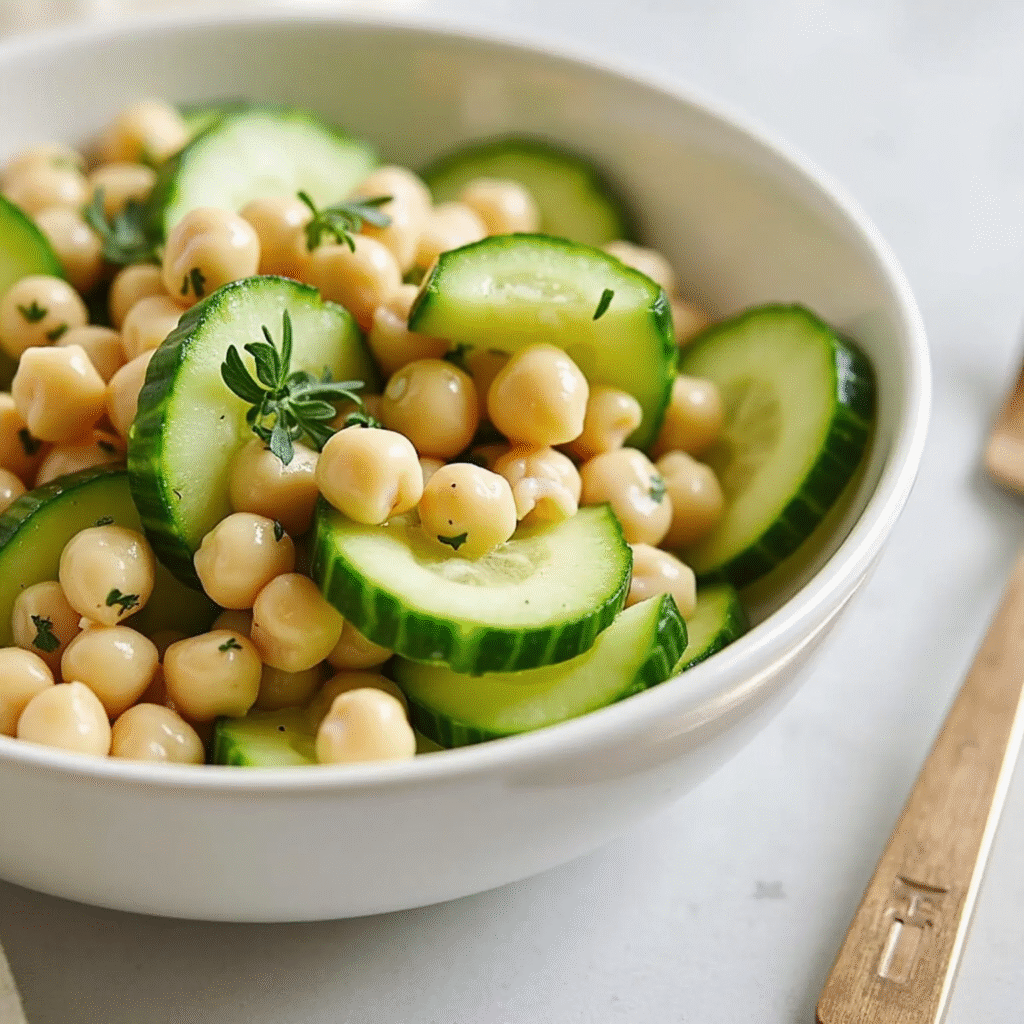
In the heart of a Mediterranean summer, simplicity reigns supreme. Fresh produce, bold flavors, and nutrient-dense ingredients come together in dishes that nourish the body and satisfy the soul. One such staple is the Chickpea and Cucumber Salad—a refreshing, wholesome dish that’s as perfect for a light lunch as it is for a picnic, potluck, or post-workout meal.

This salad is deeply rooted in Mediterranean tradition, where legumes like chickpeas (also known as garbanzo beans) are cherished for their versatility and nutrition. I first tasted a version of this salad during a trip to the coast of Sicily, where a local cook tossed together a few humble ingredients from her garden and pantry and created something magical. With a few tweaks, I’ve adapted that memory into this recipe that I now prepare all year round.


Why You’ll Love This Chickpea and Cucumber Salad

  • Wholesome and filling – Chickpeas are rich in fiber and plant-based protein.
  • Naturally vegan and gluten-free
  • No cooking required – Just chop, mix, and enjoy!
  • Perfect for meal prep – Holds up well in the fridge for days.
  • Loaded with Mediterranean flavor – Fresh herbs, olive oil, and a zingy lemon dressing.

Ingredients (Serves 1)

  • 1 cup cooked chickpeas (or canned, drained and rinsed)
  • ½ English cucumber, diced
  • 1 small tomato, diced (optional, for a pop of color)
  • 2 tablespoons red onion, finely chopped
  • 1 tablespoon fresh parsley, chopped
  • 1 tablespoon fresh mint, chopped
  • 1 tablespoon extra virgin olive oil
  • Juice of ½ lemon
  • Salt and black pepper to taste
  • Optional: a pinch of sumac or za’atar for authentic Mediterranean flavor
  • Optional topping: crumbled feta cheese or a spoonful of hummus (if not vegan)

Instructions

Step 1: Prep the Vegetables

Dice the cucumber, tomato (if using), and red onion into bite-sized pieces. Finely chop the parsley and mint. Fresh herbs really make this salad sing, so don’t skip them!

Step 2: Mix the Base

In a medium bowl, combine the chickpeas, cucumber, red onion, and tomato. Toss gently to mix.

Step 3: Dress It Up

Drizzle the olive oil and lemon juice over the salad. Season with salt, black pepper, and a pinch of sumac or za’atar if you have it. Mix everything well so the chickpeas are evenly coated.

Step 4: Garnish and Serve

Top with parsley and mint. If you’re adding feta or hummus, do so just before serving. Enjoy immediately or refrigerate for up to 3 days.


Nutritional Profile

Each serving of this Chickpea and Cucumber Salad is a nutritional powerhouse:

  • High in plant-based protein – thanks to chickpeas
  • Rich in fiber – helps with digestion and satiety
  • Packed with antioxidants – from herbs, lemon juice, and cucumber
  • Healthy fats – from olive oil

Health Benefits of Chickpeas and Cucumbers

Chickpeas:

  • High in protein and fiber
  • Support heart health by lowering cholesterol
  • Great for blood sugar control due to their low glycemic index

Cucumbers:

  • Hydrating – made up of over 95% water
  • Support skin health and digestion
  • Rich in vitamin K and antioxidants

Flavor Variations

Want to change it up? Here are some delicious ideas:

  • Spicy kick: Add a pinch of chili flakes or finely diced jalapeño
  • Sweet twist: Toss in some pomegranate seeds or dried cranberries
  • Hearty upgrade: Add quinoa, brown rice, or bulgur
  • Nutty crunch: Top with toasted pine nuts or slivered almonds
  • Creamy: Mix in a spoonful of tahini or avocado

Seasonal Adaptability

  • Summer: Enjoy it cold straight from the fridge, maybe with fresh cherry tomatoes.
  • Winter: Add roasted sweet potatoes or steamed kale for warmth and depth.

Serving Ideas

  • Solo Meal: One serving is perfect for lunch or a light dinner.
  • Side Dish: Serve alongside grilled chicken, falafel, or lamb.
  • Picnic Favorite: Ideal for outdoor meals, as it travels well and doesn’t wilt.

Meal Prep Tip

Make a big batch and portion it into jars or containers. The flavors deepen after a few hours in the fridge, making it even better the next day!


Frequently Asked Questions

Can I use dried chickpeas?
Absolutely! Soak them overnight and cook until tender. It’s more economical and often more flavorful than canned.

Is it okay to skip the herbs?
The herbs add brightness, but if you’re out, try a sprinkle of dried oregano or basil instead.

How long does it last?
Up to 3 days in the refrigerator. It actually tastes better after marinating for a few hours.

Can I make this ahead of time?
Yes! In fact, this salad is perfect for making ahead and tastes even better after a few hours.


Why This Salad Works for Any Lifestyle

Whether you’re vegetarian, vegan, gluten-free, or just looking for healthier options, this Chickpea and Cucumber Salad fits seamlessly into your routine. It’s satisfying without being heavy, fresh without being bland, and easy without being boring.

It also offers that signature Mediterranean balance—fresh vegetables, olive oil, and herbs—that’s been shown to promote longevity and heart health. If you’re transitioning into healthier eating, this salad is a delicious first step.


External Resources

To learn more or pair with other dishes, check out:

Coconut Almond Bars – A Healthy and Delicious Treat for Any Season

Stack of homemade coconut almond bars on parchment paper with shredded coconut and almonds scattered around.

There are few pleasures more satisfying than a snack that hits all the right notes—nutritious, indulgent, and incredibly simple to make. Coconut Almond Bars are the perfect embodiment of this balance. Whether you’re cozying up with a warm drink in winter or grabbing a post-beach snack in summer, these bars are your go-to treat.

This recipe holds a special place in my heart, passed down from my nonna who always believed that wholesome ingredients could create the most memorable flavors. She often made these bars as a quick afternoon snack, sneaking them into my school lunchbox or offering one with a cup of chamomile tea. I’ve given her recipe a modern twist, making it even more nutritious without sacrificing its naturally sweet and nutty charm.


Why You’ll Love These Coconut Almond Bars

  • Naturally Sweetened – Made with honey or maple syrup, no refined sugar here!
  • Gluten-Free and Dairy-Free – Suitable for a variety of dietary needs.
  • Packed with Healthy Fats – Almonds and coconut provide long-lasting energy.
  • Easy to Make – No baking required, perfect for beginners or busy days.
  • Perfect for All Seasons – Light enough for summer, hearty enough for winter.

Ingredients

Here’s what you’ll need to make about 10 delicious Coconut Almond Bars (each serving is 1 bar):

  • 1 ½ cups unsweetened shredded coconut
  • 1 cup raw almonds (chopped or slivered)
  • ½ cup almond butter (natural, no added sugar)
  • ¼ cup honey or maple syrup (for a vegan option)
  • 1 tsp vanilla extract
  • 1 tbsp chia seeds (optional, for extra fiber and texture)
  • ¼ tsp sea salt
  • ¼ cup dark chocolate chips (optional, for topping)

Instructions

1. Prepare the Dry Mix

In a large mixing bowl, combine shredded coconut, chopped almonds, chia seeds (if using), and sea salt. Mix well to distribute the ingredients evenly.

2. Make the Binding Mixture

In a small saucepan over low heat, combine almond butter, honey (or maple syrup), and vanilla extract. Stir continuously until the mixture is smooth and slightly warmed. This will make it easier to mix with the dry ingredients.

3. Combine Everything

Pour the warm almond butter mixture over the dry ingredients. Stir thoroughly until everything is well coated. The mixture should be sticky and hold together when pressed.

4. Press into a Pan

Line a square baking dish (8×8 inches) with parchment paper. Transfer the mixture into the pan and press it down firmly with a spatula or the back of a spoon. Make sure it’s tightly packed to help the bars hold their shape.

5. Add Optional Topping

If you’re using chocolate chips, sprinkle them evenly over the top and lightly press them into the mixture.

6. Chill and Set

Place the pan in the refrigerator for at least 1-2 hours, or until the bars are firm. You can also freeze them for a quicker set.

7. Slice and Enjoy!

Once set, lift the mixture out of the pan using the parchment paper and cut into 10 bars. Store in an airtight container in the fridge for up to 1 week or freeze for up to a month.


Nutritional Highlights

Each bar provides a well-balanced snack with:

  • Healthy fats from almonds and coconut
  • Natural sweetness from honey/maple syrup
  • Plant-based protein
  • High fiber content (especially with chia seeds)

Variations to Try

Feel like experimenting? Here are a few delicious twists:

  • Add dried cranberries or raisins for a tart-sweet kick.
  • Use cashew or peanut butter instead of almond butter.
  • Mix in some oats for a heartier texture.
  • Drizzle with melted dark chocolate for extra decadence.

Serving Suggestions

  • For breakfast: Pair a bar with a smoothie or Greek yogurt.
  • As a post-workout snack: Their protein and healthy fats make them great for recovery.
  • On-the-go energy: Perfect for hiking, travel, or work breaks.
  • As a dessert: Serve chilled with a glass of almond milk or warm herbal tea.

Seasonal Adaptability

Winter Tip: Warm a bar slightly in the microwave and serve it with a spiced chai latte.

Summer Tip: Freeze the bars and enjoy them straight from the freezer for a refreshing treat!


FAQs

Can I use sweetened coconut?
You can, but it will increase the sugar content. Unsweetened coconut keeps these bars on the healthier side.

Can I make this nut-free?
Yes! Use sunflower seed butter and substitute almonds with sunflower seeds or pumpkin seeds.

How do I store them?
Refrigerate in an airtight container for up to a week or freeze for longer shelf life.


Why Homemade is Better

Many store-bought bars contain preservatives, high-fructose corn syrup, or artificial flavors. Making your own Coconut Almond Bars means full control over the ingredients—more nutrients, fewer fillers, and a taste that’s fresh and authentic.


Bringing It All Together

Healthy eating doesn’t have to be boring, and Coconut Almond Bars prove it. These bars combine flavor, texture, and nutrition in every bite. They’re incredibly easy to make, easy to love, and perfect for anyone who wants a satisfying snack without compromising on health.

So next time you’re looking for something quick, wholesome, and downright delicious—skip the store aisle. Head into your kitchen and whip up a batch of these Coconut Almond Bars instead.

You—and your tastebuds—won’t regret it.


External Links to Explore More:

Tomato Tart: A Timeless Recipe for Every Occasion

tomato tart is a savory masterpiece that combines the vibrant flavors of ripe tomatoes with a crisp, buttery crust. Perfect for brunch, appetizers, or light dinners, this versatile dish brings together simple ingredients for an impressive result. Featuring layers of roasted tomatoes, herbs, and cheese, the tart is both delicious and visually stunning.


What Makes a Tomato Tart Special?

The beauty of a tomato tart lies in its simplicity and adaptability. Using seasonal ingredients like heirloom, cherry, or grape tomatoes ensures the best flavor. Not sure which tomatoes to use? Learn more about using ripe tomatoes effectively in recipes like this Baked Chicken Fettuccine Alfredo Recipe, which also benefits from fresh, flavorful ingredients.

The crust is another key element, offering a flaky, golden base to support the juicy tomato filling. If you love experimenting with textures and flavors, consider pairing this tart with dishes like this creamy and cheesy Alfredo recipe.


Ingredients for a Perfect Tomato Tart

Here’s what you’ll need for this recipe:

  • Crust: Flour, butter, Parmesan, polenta, and salt for a crisp, flavorful base.
  • Tomatoes: Heirloom, cherry, or grape tomatoes bring the best balance of sweetness and acidity.
  • Cheese: Goat cheese, Gruyère, or mozzarella.
  • Seasonings: Garlic, capers, olive oil, and red pepper flakes.
  • Herbs: Fresh basil, thyme, or chives for garnish.

Step-by-Step Recipe for Tomato Tart

1. Prepare the Crust

The foundation of any tomato tart is its crust, offering the perfect balance of crispness and flavor.

Steps:

  • Combine flour, polenta, Parmesan, and salt in a bowl.
  • Add melted butter and mix until crumbly.
  • Press the dough into a tart pan and bake at 375°F (190°C) until golden brown.

For more ideas on crafting flavorful bases, explore other tart inspirations on Tasty Mealy.


2. Prep the Tomatoes

Tomatoes are the star ingredient, and proper preparation ensures the best results.

Tips:

  • Choose small, ripe tomatoes for the sweetest flavor.
  • Slice thinly and pat dry to remove excess moisture.

3. Assemble the Tart

Layer the crust with cheese, tomatoes, and seasonings for a balanced, flavorful tart.

Steps:

  1. Spread a thin layer of cheese on the baked crust.
  2. Arrange tomato slices in overlapping circles for a stunning visual effect.
  3. Add garlic, capers, and a drizzle of olive oil.

4. Bake and Finish

Bake the tart at 375°F (190°C) for 55–60 minutes until the tomatoes caramelize and the crust turns golden.

Finishing Touches:

  • Drizzle olive oil and add a splash of vinegar.
  • Garnish with fresh herbs for extra flavor and presentation.

Creative Variations for Tomato Tart

Explore these ideas to customize your tart:

  • Add zucchini or eggplant slices for a Mediterranean twist.
  • Use puff pastry for a quicker, flakier crust.
  • Incorporate crumbled feta or blue cheese for bold flavors.

FAQs About Tomato Tart

1. How do I prevent a soggy crust?
Use polenta in the crust and pat the tomatoes dry before baking.

2. Can I use store-bought pastry?
Yes, puff pastry or pre-made tart shells work as great shortcuts.

3. What cheese pairs best with a tomato tart?
Parmesan, Gruyère, or goat cheese are all excellent choices.

4. Can I make this tart gluten-free?
Absolutely! Substitute almond flour or gluten-free flour for the crust.


Conclusion

tomato tart is a celebration of fresh ingredients and simple preparation. Whether served as an appetizer or a centerpiece dish, it’s guaranteed to impress. Pair it with a fresh salad or creamy sides like the Baked Chicken Fettuccine Alfredo Recipe for a complete, satisfying meal. Try this recipe today and discover the charm of this timeless dish!