No-Bake Cheesecake: A Creamy Slice of Summer Bliss

Creamy no-bake cheesecake with fresh berries and graham cracker crust.

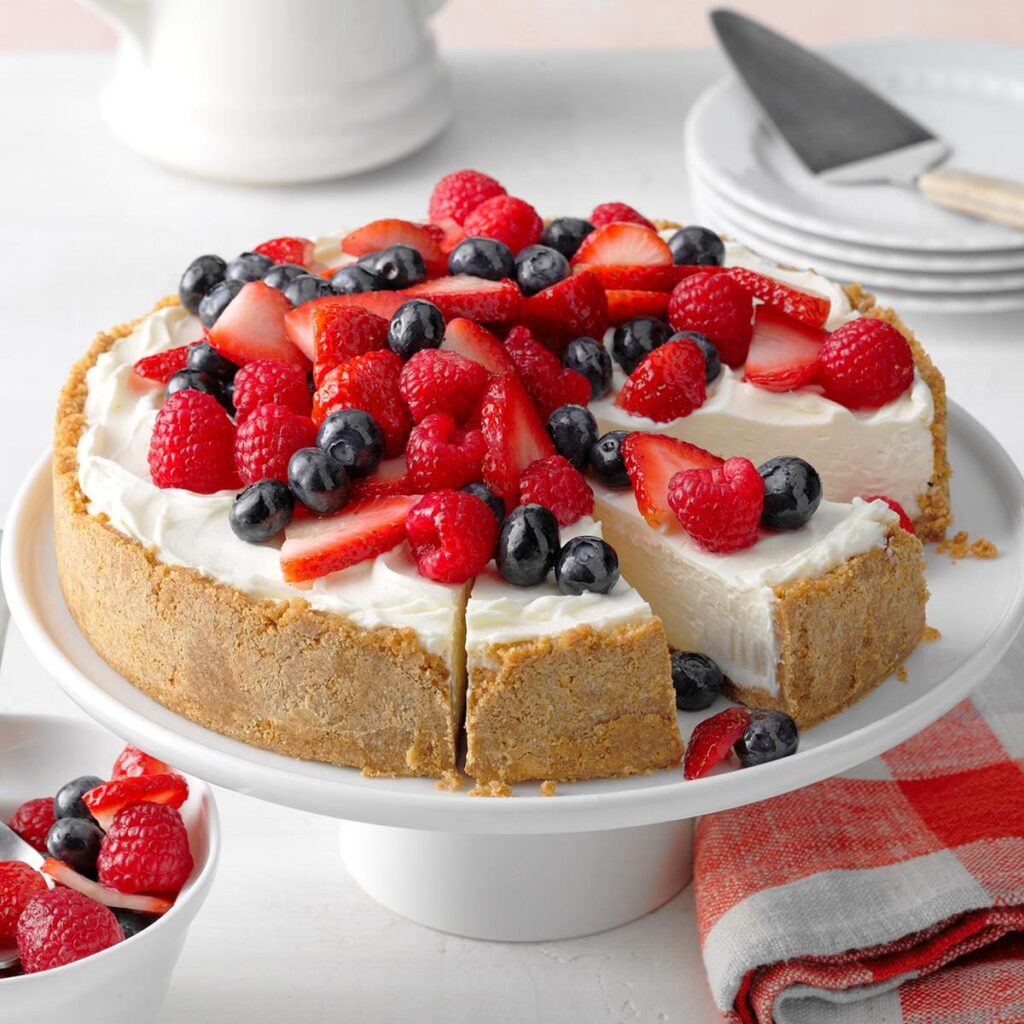
When summer heat makes turning on the oven feel like a crime, my grandmother’s no-bake cheesecake becomes my secret weapon. She used to whip it up on sweltering July afternoons in her little Italian kitchen, layering it with sun-ripened berries picked from her garden. Creamy, cool, and beautifully simple, this cheesecake was our go-to celebration of summer’s sweet side. Now, I pass this classic onto you, with a few tweaks to make it even easier and just as indulgent.

Whether you’re planning a picnic, hosting a party, or just craving something rich and fruity without the fuss, this no-bake cheesecake will steal the show on your dessert table. No oven, no stress—just creamy, chilled perfection.


Why You’ll Love This No-Bake Cheesecake

  • Zero Baking Required: Perfect for summer days when the last thing you want is a hot kitchen.
  • Quick & Simple: Only a handful of ingredients and a few steps.
  • Customizable: Add your favorite fruit toppings or leave it plain—either way, it’s heavenly.
  • Crowd-Pleasing Texture: Light, fluffy, and irresistibly creamy.

Ingredients

For the Crust:

  • 2 cups graham cracker crumbs
  • ½ cup unsalted butter, melted
  • 2 tablespoons granulated sugar

For the Filling:

  • 16 oz cream cheese, softened
  • ⅔ cup granulated sugar
  • 1 teaspoon vanilla extract
  • 1 cup cold heavy whipping cream

Optional Toppings:

  • Fresh berries (strawberries, blueberries, raspberries)
  • Fruit compote or jam
  • Lemon zest or mint leaves for garnish

Step-by-Step Instructions

Step 1: Prepare the Crust

  1. In a medium mixing bowl, combine graham cracker crumbs and 2 tablespoons of sugar.
  2. Pour in the melted butter and mix until the crumbs are evenly moistened.
  3. Press the mixture firmly into the bottom of a 6-inch springform pan (for one generous serving or two smaller ones).
  4. Use the bottom of a glass or spoon to smooth and compress the crust.
  5. Chill the crust in the fridge while you make the filling.

Step 2: Make the Cheesecake Filling

  1. In a large bowl, beat the softened cream cheese until smooth and creamy.
  2. Add the granulated sugar and vanilla extract. Continue beating until fully combined and fluffy.
  3. In a separate bowl, whip the heavy cream until stiff peaks form.
  4. Gently fold the whipped cream into the cream cheese mixture, being careful not to deflate the air you’ve whipped in.

Step 3: Assemble & Chill

  1. Spoon the cheesecake filling over the prepared crust.
  2. Smooth the top with a spatula or back of a spoon.
  3. Cover with plastic wrap and refrigerate for at least 4 hours, or until set. Overnight is even better for maximum flavor and firmness.

Step 4: Add Your Toppings

  1. Just before serving, top your cheesecake with fresh berries or your favorite fruit topping.
  2. Garnish with a sprig of mint or a little lemon zest for a fresh finish.

Tips & Tricks for the Best No-Bake Cheesecake

  • Softened Cream Cheese: Make sure your cream cheese is fully softened to avoid lumps.
  • Whipping Cream Matters: Use heavy cream, not milk or half-and-half, and whip it until stiff peaks form.
  • Chill Time is Key: Don’t rush it—give your cheesecake plenty of time to firm up in the fridge.
  • Make It Yours: Try a chocolate cookie crust, add citrus zest to the filling, or drizzle with caramel for variety.

Perfect Pairings

  • Beverage: Enjoy with a glass of Moscato, iced espresso, or a berry lemonade.
  • Serving Idea: Pair it with shortbread cookies or serve in a mini jar for a picnic-friendly twist.
  • For the Sweet Tooth: Add a layer of Nutella between the crust and filling.

Make Ahead & Storage

  • Make Ahead: This cheesecake can be prepared a day in advance and topped just before serving.
  • Storage: Keep leftovers covered in the fridge for up to 3 days. Not suitable for freezing, as the texture may change.

Final Thoughts

This no-bake cheesecake is everything a summer dessert should be—light, luscious, and so simple you’ll find yourself making it again and again. Whether you’re a beginner in the kitchen or a seasoned home baker, this creamy treat will bring a slice of joy to your summer gatherings. Try it, share it, and don’t forget to tag your creations with #nobake #cheesecake #dessertlover and more!

Apple Pie Cheesecake: A Cozy Winter Twist on Two Classic American Desserts

A slice of apple pie cheesecake topped with cinnamon apples and a buttery crumble, served on a white plate.

There are few things more comforting on a chilly winter day than the scent of apples and cinnamon baking in the oven. For me, it takes me back to my grandmother’s kitchen in upstate New York, where she’d bake apple pies with fruit we picked ourselves every fall. Later, I’d bring in my own twist—layering her sweet, spiced apple filling over a creamy cheesecake base. And just like that, Apple Pie Cheesecake was born—a dessert that perfectly fuses two beloved American classics into one indulgent treat.

This dessert is all about warmth and comfort. The crisp, buttery graham cracker crust, smooth vanilla cheesecake, and gooey cinnamon-apple topping combine to create a bite that feels like a warm hug. It’s the perfect finish to a winter dinner party, Thanksgiving meal, or any time you’re craving something sweet and nostalgic.


Why You’ll Love This Apple Pie Cheesecake

  • Comforting Winter Flavors: Apples, cinnamon, and nutmeg bring that cozy holiday feel.
  • Make-Ahead Friendly: Perfect for prepping the night before.
  • Great for a Crowd: Serves 8–10 people and holds its shape beautifully.
  • Classic Americana: A true fusion of two iconic American desserts.

Ingredients

For the Graham Cracker Crust:

  • 1 ½ cups graham cracker crumbs (about 10–12 crackers)
  • ¼ cup granulated sugar
  • ½ cup unsalted butter, melted
  • ½ tsp cinnamon

For the Cheesecake Filling:

  • 3 packages (8 oz each) cream cheese, softened
  • ¾ cup granulated sugar
  • 1 tsp vanilla extract
  • 3 large eggs
  • ½ cup sour cream
  • 2 tbsp all-purpose flour
  • ½ tsp ground cinnamon

For the Apple Pie Topping:

  • 3 medium apples (Granny Smith or Honeycrisp), peeled and sliced
  • 2 tbsp unsalted butter
  • ⅓ cup light brown sugar
  • 1 tsp ground cinnamon
  • ¼ tsp ground nutmeg
  • 2 tsp cornstarch
  • 2 tbsp water
  • 1 tsp vanilla extract

Optional Garnish:

  • Whipped cream
  • Caramel drizzle
  • Crushed graham crackers

Equipment You’ll Need

  • 9-inch springform pan
  • Stand mixer or hand mixer
  • Mixing bowls
  • Medium saucepan
  • Spatula
  • Cooling rack

Step-by-Step Instructions

1. Prepare the Crust

  1. Preheat your oven to 325°F (160°C).
  2. In a bowl, mix together graham cracker crumbs, sugar, cinnamon, and melted butter until the crumbs are fully coated.
  3. Press the mixture firmly into the bottom of a greased 9-inch springform pan. Use the back of a measuring cup for a smooth, even surface.
  4. Bake the crust for 10 minutes. Remove and let cool slightly.

2. Make the Cheesecake Filling

  1. In a large mixing bowl, beat the softened cream cheese until smooth and creamy.
  2. Add sugar, vanilla, flour, and cinnamon. Beat until fully incorporated.
  3. Add eggs one at a time, mixing on low speed and scraping down the sides as needed.
  4. Fold in the sour cream until smooth.
  5. Pour the cheesecake filling over the crust and smooth the top.

3. Bake the Cheesecake

  1. Place the springform pan on a baking sheet. Bake at 325°F (160°C) for 55–65 minutes, or until the center is slightly jiggly but set.
  2. Turn off the oven, crack the door open, and let the cheesecake cool in the oven for 1 hour to prevent cracks.
  3. Transfer to a wire rack and cool completely before refrigerating for at least 4 hours (preferably overnight).

4. Make the Apple Pie Topping

  1. In a medium saucepan over medium heat, melt butter. Add sliced apples, brown sugar, cinnamon, and nutmeg.
  2. Cook for 5–7 minutes, stirring occasionally, until apples are tender but not mushy.
  3. Stir in the cornstarch mixed with water and cook until the mixture thickens, about 2 minutes.
  4. Remove from heat, stir in vanilla, and let cool to room temperature.

5. Assemble and Serve

  1. Once the cheesecake is fully chilled, spoon the cooled apple topping evenly over the top.
  2. Garnish with whipped cream or a drizzle of caramel if desired.
  3. Slice and serve!

Make It Ahead

This Apple Pie Cheesecake is an ideal make-ahead dessert. Simply bake and chill the cheesecake a day in advance, and prep the apple topping separately. Assemble just before serving to maintain the topping’s freshness and texture.


Tips for the Perfect Apple Pie Cheesecake

  • Room Temperature Ingredients: Ensure your cream cheese, eggs, and sour cream are at room temperature for a smooth, lump-free batter.
  • No Cracks Please: Don’t overmix the batter and avoid opening the oven while baking.
  • Chill Time: Let the cheesecake chill for at least 4 hours. Overnight is best.
  • Apple Variety: Use tart apples like Granny Smith to balance the sweetness of the cheesecake.

Variations

  • Apple Crumble Cheesecake: Add a buttery crumble topping over the apples before serving.
  • Salted Caramel Apple Cheesecake: Drizzle homemade or store-bought salted caramel sauce on top.
  • Mini Cheesecakes: Use a muffin tin for personal-sized versions, perfect for parties.

Pairing Suggestions

This dessert pairs wonderfully with:

  • Spiced Chai Latte or Hot Apple Cider: For that full winter experience.
  • Sweet Dessert Wine: Such as Riesling or Moscato.
  • Vanilla Ice Cream: If you’re feeling extra indulgent.

Storage Instructions

  • Refrigerator: Store covered in the fridge for up to 5 days.
  • Freezer: Freeze individual slices wrapped tightly in plastic and foil for up to 2 months. Thaw in the refrigerator before serving.

Reader’s Corner

Have you tried this Apple Pie Cheesecake recipe? Did you add your own twist—maybe a different spice or a pecan crust? I’d love to hear your take! Share your version in the comments below or tag your photo with #CozyKitchenWithSarah on Instagram!


External Resources

Here are some useful links for deeper dives: